Disclaimer: Most of these notes are based on my own internal wiki notes when I deployed Velero in my lab. They may be out of date between the date of publication and when you read it.
What is Velero?
Velero is VMware’s open-source backup and restore tool for workloads running in Kubernetes. It’s available to anyone for use on Kubernetes, and supports several combinations of integrations with underlying cloud platforms (AWS, Azure, vSphere, etc).
It’s commonly used for Disaster Recovery, Data Migration (between Kubernetes clusters), and (obviously) Data Protection.
These aren’t crash-consistent VM backups from yester-year. These are Kubernetes-aware (and optionally application-aware) backup/restore mechanisms ensuring consistent data protection within and across Kubernetes clusters. It can integrate with your Kubernetes cloud provider to backup the details of your Kubernetes workloads within the Kubernetes API, as well as take snapshots of the underlying Persistent Volumes and copy them to an S3 endpoint of your choice. Alternatively, you can configure File System Backups (FSB) of the data within those Persistent Volumes using restic, tar those files up and ship them to an S3 endpoint of your choice.
Something I have come to enjoy with Velero is the ability to include or exclude objects based on a filtering parameter, called Resource Filtering. You can include or exclude based on a namespace and/or resource types.
While exploring Velero I was very pleased to find that the process I’ve outlined below works on TKGm and any cluster deployed by VMware Cloud Director Container Service Extension.
Architecture
Velero is comprised of several components:
- The Velero CLI
- Velero Custom Resource Definitions (one each for on-demand backup, scheduled backup, and restore)
- Velero Backup controller/server
- Cloud & Storage Provider Plugins
To be fair, the last 3 points above are usually considered “one” component in the official docs but when I was exploring and configuring Velero it helped me to think of them as separate components.
Velero CLI
The Velero CLI is responsible for the installation and configuration of Velero on your cluster as well as backup and restore job operations.
It leverages your kubectl context to determine the cluster you’re performing operations against.
Velero Custom Resource Definitions
Velero adds Custom Resource Definitions (CRDs) to your Kubernetes cluster that capture details of one-off backup, scheduled backup and restore jobs. These CRDs are monitored by the Velero controller for adds/changes/removals that are then executed by the Velero server-side components.
The definitions can also include pre and post backup and restore commands or scripts - also called Hooks.
Read more about the CRDs and how Velero works here: https://velero.io/docs/v1.11/how-velero-works/
Velero Backup Controller
The Backup Controller is the “server-side” end of Velero. It runs on the Kubernetes cluster as a Pod and monitors etcd for changes to any instances of those CRDs mentioned earlier. If there is a change or a scheduled time is met the Backup Controller will proceed to perform the action: interacting with Velero plugins to perform operations, such as volume snapshots, or in the event of file-based: backing up the target objects, tarballing them and sending them to an object store.
The Velero docs site has a great diagram:
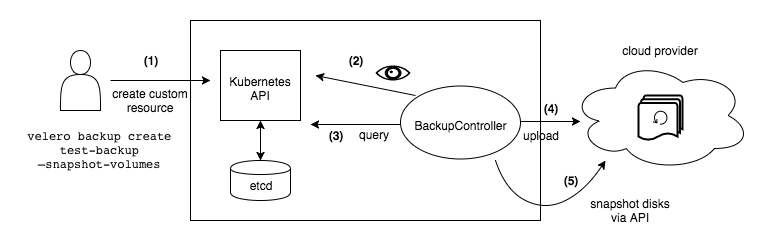
It’s important to note that if your backing cloud provider plugin does not have a mechanism to snapshot a disk and send that disk to an object store, then you won’t be able to do that with Velero. However, Velero has a File-Based backup mechanism which I’ll get to.
Cloud & Storage Provider Plugins
Velero has a plugin architecture allowing 3rd party cloud platforms and storage providers to offer their unique platform services as a capability that Velero can leverage.
Velero uses these plugins to snapshot volumes or send data to an object store. These functions are either in the same plugin (for example if you use AWS) or it can be two separate plugins to theoretically achieve the same outcome; if you’ve deployed TKGm on vSphere, you can enable the all-purpose CSI option in conjunction with the vSphere CSI to snapshot the VM disks that back the PVCs and copy the snapshots to an S3 endpoint using the AWS plugin. I have yet to test this functionality end-to-end.
When installing plugins with the velero command, there is no clear distinction between a cloud provider plugin (for taking snapshots) and a storage plugin (for backup data storage), which confused me at first.
Initial configuration options
Velero itself is deployed in the same process regardless of your backing cloud platform. However, considering the number of plugins and integrations available to you with Velero it’s good to know what it can and can’t do, and how those might influence your initial installation command(s).
The Velero team has done a great job detailing the plugins and their capabilities here: https://velero.io/docs/v1.11/supported-providers/. Pay careful attention to each plugin’s capabilities in that table, as well as the details referenced in each plugins repository.
Using that table you can identify which plugins you’ll need to install from the get-go and avoid re-doing it later.
Deployment
For this article, I’ll be deploying Velero in a TKGm-managed Kubernetes cluster that is running on vSphere 7. My goal is to be able to backup applications running in my TKGm cluster and have the data sent to S3 (and of course be able to restore it).
Because I’m running on vSphere, Velero will not be performing a snapshot of the VMs and disks. vSphere does not support “durable” snapshots (snapshots where the resulting file is placed on separate storage). Which makes sense, a vSphere snapshot is not treated like a backup. Instead, what I’ll need Velero to do is reach into the Persistent Volumes in my Pods and copy the files from the mounted volumes. This is done using Velero’s File-System Backup (FSB) function.
About File-System Backup (FSB)
Taken from the Velero project page: https://velero.io/docs/v1.11/file-system-backup/
Velero’s File System Backup is an addition to the aforementioned snapshot approaches. Its pros and cons are listed below:
Pros
- It’s capable of backing up and restoring almost any type of Kubernetes volume. Therefore, if you need a volume snapshot plugin for your storage platform, or if you’re using EFS, AzureFile, NFS, emptyDir, local, or any other volume type that doesn’t have a native snapshot concept, FSB might be for you.
- It’s not tied to a specific storage platform, so you could save the backup data to a different storage platform from the one backing your Kubernetes volumes, for example, backing up data from a vSAN based Kubernetes volume to any S3 object store.
Cons
- It backs up data from the live file system, so the backup data is less consistent than the snapshot approaches.
- It accesses the file system from the mounted hostpath directory, so the pods need to run as root user and even under privileged mode in some environments.
With that in mind, let’s move on.
CLI Installation
The CLI installation is so easy, I’m not even going to regurgitate it: https://velero.io/docs/v1.11/basic-install/#install-the-cli
Once the CLI is installed, it will use your active kubectl context to connect to your Kubernetes cluster. Make sure you’re in the right context before you start the install process.
Velero Installation
Velero is relatively straight forward to install, but the order of operations and the command itself takes a bit to understand.
When you run the velero install command you are expected to provide a number of configuration options that configure the Velero server component on first install. At a minimum, you need to configure a provider (backup storage location) and a starting plugin (cloud backup type). For example AWS as the backup storage location (S3) and vsphere for the vSphere volume snapshots. Depending on your plugins, additional options will need to be included.
If using S3 storage, you’ll also need the Access Key ID and Secret Key ID in a file, for example:
| |
If you look at the documentation, specifically the end of the basic install, you’ll see this note:
Note: if your object storage provider is different than your volume snapshot provider, follow the installation instructions for your object storage provider first, then return here and follow the instructions to add your volume snapshot provider.
My interpretation of this is that you use the velero install command to configure Velero with your object storage first, then after you’ve installed Velero you can install your volume snapshot plugin and configure it. For our vSphere deployment of TKGm, we do not need to specify a volume snapshot plugin (as mentioned previously).
Let’s take an example command that I used for my lab:
| |
velero install- pretty obvious, this is the start of the install command.--provider aws- this flag is the backup storage provider. In our case, we are wanting to use the AWS plugin to store data in an AWS S3 bucket (or any S3-compatible bucket). Required--use-node-agent- This flag facilitates file-level backups from the volume. Usually optional, but necessary for our use case--plugins velero/velero-plugin-for-aws:v1.6.0- Velero requires at least one plugin to initiate.--bucket <s3-bucket-name>- Specify the name of the S3 bucket.--secret-file <path to secret file>- the path to your S3 credentials file.--use-volume-snapshots=false- this is required to control Velero’s behaviour before the backup activity is performed. I do not want snapshots taken as part of my backup process (what’s the point?)--backup-location-config region=<s3-region>,s3ForcePathStyle="true",s3Url=https://<s3-bucket-name>.<s3region>.amazonaws.com- Configuration to use for the backup storage location.
EDIT (2023-08-15)
With these options Velero will deploy into my TKGm cluster, ready to perform snapshopt and/or file system backups of my persistent volumes and store them in S3. However, the default behaviour for PVC backups will still be snapshot based. One additional flag will need to be included when creating backup jobs. Alternatively, you can add an additional flag to the above install command and have it set as a system-wide default: --default-volumes-to-fs-backup
With these options I’ll have Velero deployed in my TKGm Kubernetes cluster, configured to perform file-system backups of my persistent volumes, and store those backups in an AWS S3 backup of my choice.
Running this command will create the CRDs for backup operations along with the appropriate Pod to run the Velero server component, and the DaemonSet’s for File System Based backups. If, for some reason, you need to modify one of these parameters you can re-run the entire command with the corrected parameter.
The velero uninstall command works as you’d expect - removes Velero from your Kubernetes cluster - and has been very handy to get the right combination of plugins installed during my testing.
End
That’s all there is to installing Velero. In my next post I will be covering the creation of backup jobs and showing off a restore using Velero.