If you followed my previous posts on auto deploying a Hugo site from GitHub to S3 (Part 1, Part 2) you may have noticed that GitHub is deprecating the GitHub Services Integration mechanism. This is critical to the auto deployment function so we’ll need an alternative. To add to my woes, I’ve found that the Node deployment package and all of its dependencies involves more maintenance than it deserves. I also noticed that the original Node package was only adding to the target S3 bucket, not performing a sync or equivalent.
What I hope to do in this post is show you how to create a new solution using AWS’ Lambda and API Gateway services so it can deploy a Hugo static site to AWS S3 from GitHub using nothing but Lambda-accessible Python libraries. Yes, I’m so against ongoing maintenance that I’d rather learn Python and rewrite my JavaScript function so that I don’t have to update a dozen Node packages and develop some ridiculous CI/CD pipeline just to manage static site deployments.
Objectives
Here’s what I want to achieve:
- Download the latest release of Hugo.
- Download the latest version of my website’s Hugo source from GitHub.
- Run
hugoto build the staticpublicpages from the source material. - Remove any existing material from the target S3 bucket.
- Copy the generated static website to the target S3 bucket.
- All of this triggered by a GitHub Webhook whenever I push to the repo.
What are we going to need? Well, we’re going to need at least one Lambda function. And an API Gateway to receive the Webhook from GitHub which can then invoke the Lambda function. Unfortunately, GitHub has a 10 second timeout for a response from any triggered Webhook and our new Python script to deploy our site runs way over 10 seconds so GitHub will never mark our Webhook as “successful” when it’s run. To get around this, we’ll need another Lambda function between our API Gateway and our deploying Lambda function so we can perform an ‘async’ operation that will invoke our site deploying Lambda function. Our new flow of actions:
GitHub Webhook -> API Gateway -> Lambda: Async invoke site deployer -> Lambda: Deploy website
Here’s what we need to build (in order):
- Lambda - Python code to perform steps 1-5 above.
- Lambda - Python code to asyncronously invoke the above Lambda function.
- API Gateway - API’s to receive a POST from GitHub.
Create the new AWS Lambda functions
I won’t rehash too much of the Lambda creation process (see my original post) but take care, there will be some changes.
Lambda: Deploy website
For this Lambda function you need to:
- Set the Runtime to “Python 2.7”
- Set the Code entry type to “Edit code inline”
- Set the Handler value to “deploy.lambda_handler”
- Set the Timeout value to 30 seconds.
So go ahead and create the new Lambda function (with the tweaks above). Create the following environment variables too:
- GITHUB_ACCOUNT - Name of the GitHub account the repo is stored under. Typically your username.
- GITHUB_REPO - Name of the GitHub repo.
- TARGET_BUCKET - Name of the target S3 bucket. Not the URL.
You’ll also want your Lambda function to have the following IAM policy, in addition to the default that is provided when you create a Lambda function:
| |
This is almost identical to the IAM policy from my previous posts, but I’ve added the s3:DeleteObject action to address Objective 4.
Objective 1: Download the latest version of a website’s Hugo source
First up let’s grab the source of my website from GitHub. We need to grab the ZIP file that contains the master branch. Luckily for us the file is available at a static URL so I’ll just hardcode it for now. The URL is https://github.com/ + account + '/' + repo + '/archive/master.zip which I’ll build dynamically in the Python function (you’ll see). We also need to unpack the zip into the /tmp directory. The resulting path will be /tmp/reponame-master:
1def downloadSite(account, repo):
2    logger.info("Downloading master zip of " + repo + " from GitHub")
3    zip = urllib.urlretrieve('https://github.com/' + account + '/' + repo + '/archive/master.zip', '/tmp/master.zip')
4    siteZip = "/tmp/master.zip"
5
6    with ZipFile(siteZip, 'r') as zip:
7        logger.info("Extracting site files now")
8        zip.extractall("/tmp")
9        logger.info("Extraction complete!")
You’ll notice that this function takes 2 inputs; ‘account’ is the GitHub account that hosts the repo, and ‘repo’ is the name of the repo. It uses these 2 values to build the URL.
Objective 2: Downloading the latest version of Hugo
OK let’s tackle Objective 2: Downloading the latest version of Hugo. Checking out Hugo’s releases page on GitHub, you can see the file name changes for each release, so you can’t hardcode a download URL:
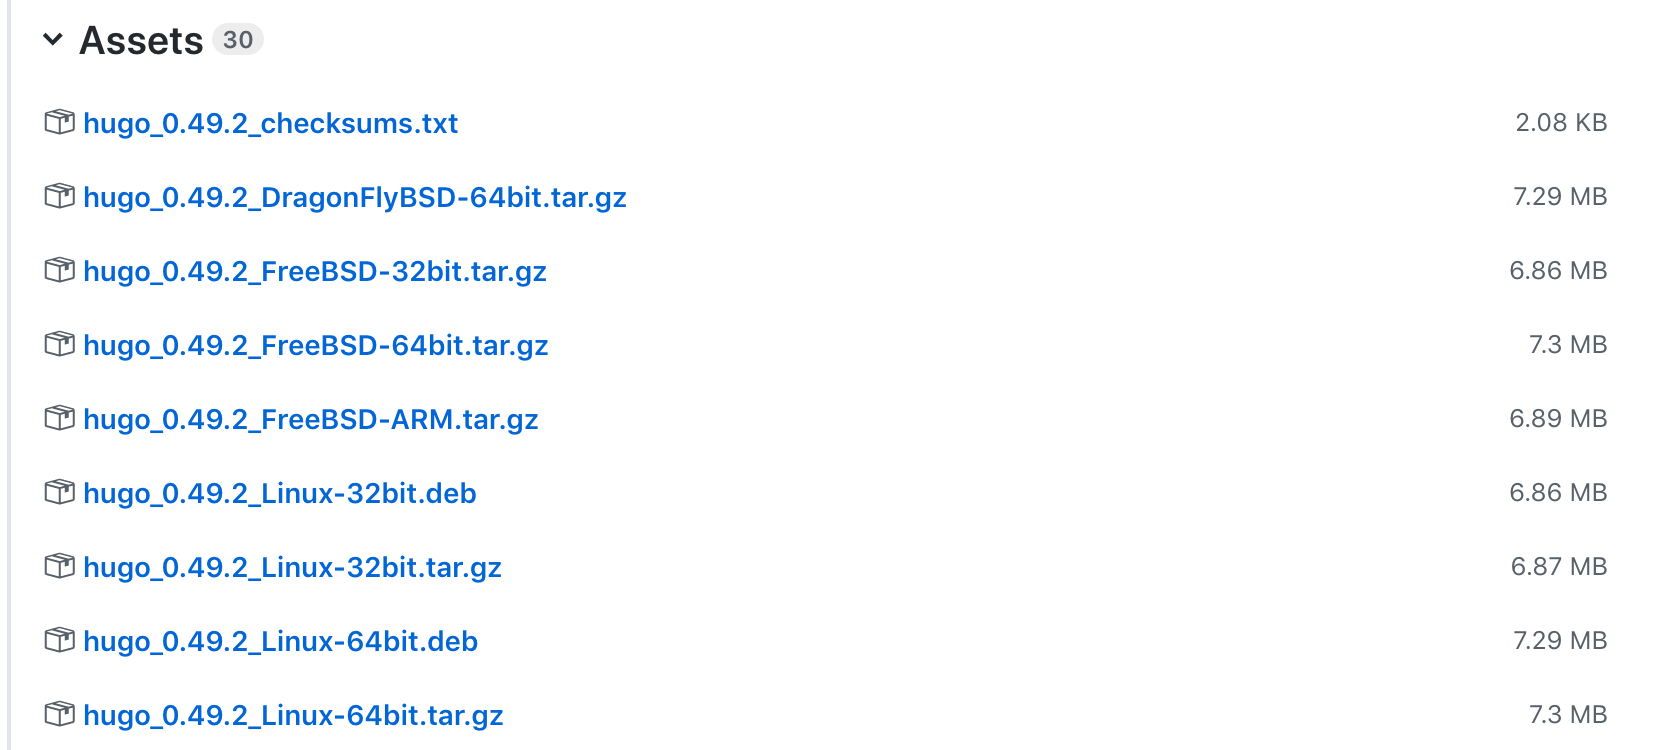
However, GitHub have an API that you can use to navigate GitHub projects programmatically. The releases page for each project can give you an array of those “Assets” that you can iterate through. Alright, now I need to use a Regular Expression to find the Linux 64bit build, regardless of version number. I also want to grab the tarball, not the deb. I’ve highlighted the important bits here:
 1def downloadHugo(repo):
 2    logger.info("Downloading latest Hugo")
 3    pattern = re.compile("hugo\\_\\d.+\\_Linux-64bit.tar.gz") # Setting the RegEx to grab what we need from the Assets array
 4    response = requests.get("https://api.github.com/repos/gohugoio/hugo/releases/latest") # GitHub API for the releases
 5    release = response.json()
 6    assets = release["assets"]
 7    for asset in assets:
 8        if pattern.match(asset["name"]):
 9            downloadUrl = asset["browser_download_url"] # Grab the download URL for the Asset
10            logger.info("Value of downloadUrl: " + downloadUrl)
11    urllib.urlretrieve(downloadUrl, '/tmp/hugo.tar.gz') # Download the file
12    logger.info("Hugo download complete")
13    logger.info("Extracting Hugo")
14    tar = tarfile.open("/tmp/hugo.tar.gz")
15    tar.extractall("/tmp/" + repo + "-master")
16    tar.close()
You can see I’m grabbing the latest releases page and parsing it as a JSON object. I’m then looping through the “assets” list looking at each asset’s name for a RegEx match. If a match is found the downloadUrl variable is set with the “browser_download_url” value from the asset. This function also takes the ‘repo’ name as an input to figure out the right directory to place the Hugo tar into: /tmp/reponame-master/. We’re putting it here so that when we’re ready to run Hugo, it’s already in the same folder as the Hugo site config file.
Objective 3: Execute Hugo to generate the website
We’ve now got a directory that contains the website source and the Hugo binary. Let’s work on executing it:
1def buildSite(repo):
2    logger.info("Building site")
3    os.chdir("/tmp/" + repo + "-master")
4    os.system('./hugo')
5    logger.info("Site built with Hugo")
6    buildDir = os.getcwd() + "/public"
7    return buildDir
Again, we’re taking the repo name in as an input to build the directory. This function switches to the same directory that contains Hugo and executes it. The last two lines concatenates a path for the generated static site location: /tmp/reponame-master/public. We’ll need this later for another function that will copy that directory to S3.
Objectives 4 & 5: Empty target bucket and copy new site to S3
You’re probably wondering why I chose to empty the target bucket then copy the data over. Well, the AWS CLI allows you to ‘sync’ a local directory to S3 but it’s not available inside Lambda’s execution space, and the boto3 Python library does not implement the sync functionality. The best workaround I could come up with for a site as ‘busy’ as mine was to just empty the target bucket and rewrite the contents whenever I update the site.
Emptying the bucket was easy enough but I had to ‘borrow’ some code to get the local->S3 recursive copy done.
 1def syncS3(path, s3Bucket):
 2    logger.info("Copying to S3")
 3    session = boto3.Session()
 4    s3 = session.resource('s3')
 5    bucket = s3.Bucket(s3Bucket)
 6    logger.info("Emptying bucket first")
 7    bucket.objects.all().delete()
 8    for subdir, dirs, files in os.walk(path):
 9        for file in files:
10            full_path = os.path.join(subdir, file)
11            with open(full_path, 'rb') as data:
12                bucket.put_object(Key=full_path[len(path)+1:], Body=data, ContentType='text/html')
13    logger.info("Generated site uploaded to S3 successfully.")
Two inputs are required for this function, the source path that I want to copy (returned from the buildSite function) and the target S3 bucket. Lines 7-12 show the bucket getting emptied and all files and folders in the /tmp/reponame-master/public directory being copied to the S3 bucket.
Tie it all together
Lambda needs a main function to call commonly referred to as the lambda_handler. It’s the ‘master’ of the other functions. It’s here that I’m going to grab the GitHub account and repo values from the Lambda environment variables too (from my older posts). It’s also here where I’ll feed these values into the functions we’ve written.
 1def lambda_handler(event, context):
 2    sourceRepo = os.environ['GITHUB_REPO']
 3    gitAccount = os.environ['GITHUB_ACCOUNT']
 4    targetBucket = os.environ['TARGET_BUCKET']
 5
 6    downloadSite(gitAccount, sourceRepo)
 7    downloadHugo(sourceRepo)
 8    buildDir = buildSite(sourceRepo)
 9    syncS3(buildDir, targetBucket)
10
11    response = {
12        'statusCode': 200,
13        'body': "lambda_handler executed"
14    }
15
16    return response
You can see at the end of my ’lambda_handler’ I’ve added a response object consisting of a HTTP code. As is, this function isn’t performing any error handling. The status code and body of the response is where you’d place any errors received during execution, but that’s something for another post.
If you jump ahead to the code at the end of the post, you’ll see the full Python script in all its glory along with my AWS Lambda function configuration to have it execute in a decent time frame.
Lambda: Asyncronously invoke another Lambda function
OK we’ve got a Lambda function that can deploy our website from the source, we now need a Lambda function to execute our first Lambda function (cue memes).
Go ahead and create a new Lambda function but this time, let’s use Python 3.6 as the Runtime. Set a new environment variable called “LAMBDA_NAME” and in the value field enter the name of the “site deploying” Lambda function you created earlier. Let’s leave the default Handler name, and skip to the code:
 1import boto3
 2import os
 3
 4def lambda_handler(event, context):
 5
 6    client = boto3.client('lambda')
 7    response = client.invoke(
 8        FunctionName=os.environ['LAMBDA_NAME'],
 9        InvocationType='Event'
10    )
11
12    return {
13        "statusCode": 200,
14        "body": 'Hugo Site Builder Executed'
15    }
Let’s break this code down:
Line 1-2 we’re importing the boto3 and os libraries.
Line 4 we’re declaring the new lambda_handler function.
Line 6 we are declaring a new boto3 client for Lambda.
Line 7-9 we’re using this new client to invoke a Lambda function using the environment variable “LAMBDA_NAME” as the name of the function to invoke. We’ve also specified that the Invocation type is “Event” which means that we will not wait for a response.
Line 12-15 we’re returning a JSON object that contains a HTTP status code (200) and a message in the body field of “Hugo Site Builder Executed”. This message will be returned by our function to API Gateway.\
We also need to provide this new Lambda function with privileges to execute other Lambda functions. Jump into the IAM console, open Roles and create a new Role. When asked what service will use the role select “Lambda” and click Next. Search for “AWSLambdaRole”. This policy allows an entity to execute any of your Lambda functions. Check the box next to it and click Next. Provide a name for the new role. I’ve called mine “custom_LambdaExecutor”. Click “Create Role”.
Go back to the “executing” function we’ve just made and set the “Execution Role” to your new Role and save the Lambda function. You’ve now got a Lambda function that can invoke another Lambda function.
Create the API Gateway
We’ve created our Lambda functions, but we haven’t configured a trigger mechanism between GitHub and AWS. We’re going to use an API Gateway.
In the AWS Console, open the Services drop down and search for API Gateway. If you haven’t got any API’s defined yet, click Get Started in the middle of the page. It’ll walk you through your first API. If you have already defined APIs, you’ll be presented with the API management page and you can create a new API there.
From the new API creation wizard, select the New API radio button and enter a name for your new API. I’ve just called mine ‘deploy-hugo-site’. Set your API to Regional for the Endpoint Type option. Click Create API.
You’ll be taken to the Resources section of your new API. This is where we define the HTTP path and methods that we want to use.
Create a new method
With the root level resource selected, click Actions and select Create Method. It’ll show a drop down menu below the ‘root level’ of the API. Select ‘POST’ and click the tick button. Configure the new method with the following details and be sure to use the name of your “executing” function (the one that triggers the “deployer”):
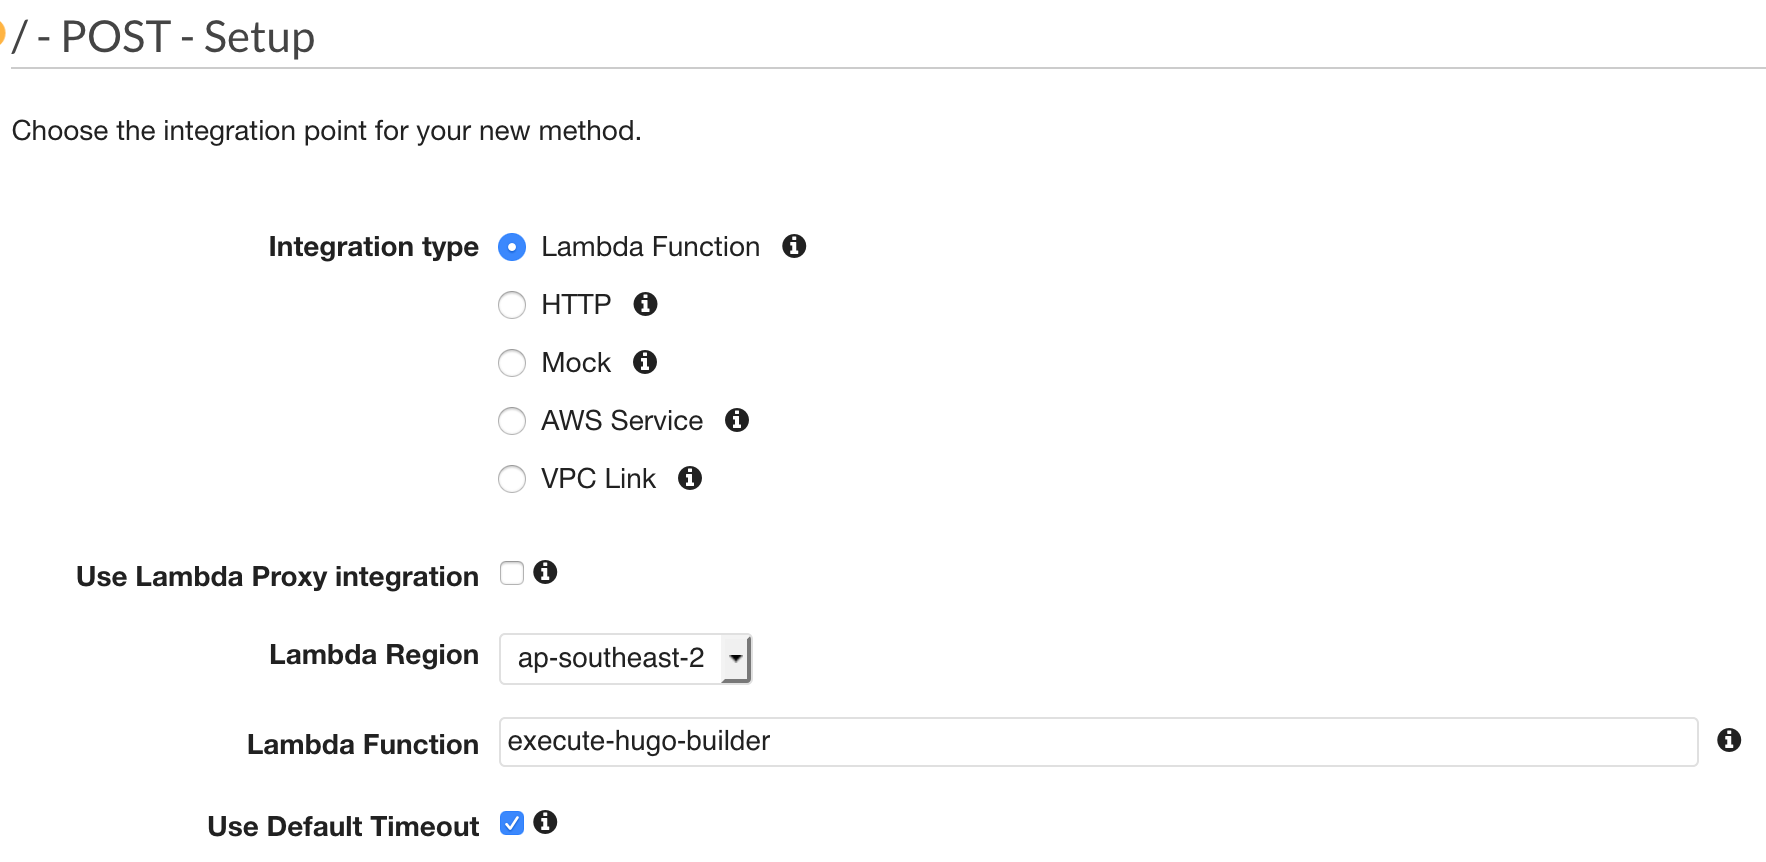
Go ahead and click Save.
Deploy the API
We need to Deploy our new API into something called a Stage. A Stage is simply a representation of development of our API. It provides a way to define different ‘stages’ of API development lifecycle; i.e Prod, Dev, Test etc. Deploying our API makes it available to those with the appropriate entitlements to use it.
In the Resources section of your API, select the root level of your API and click Actions then Deploy API. Fill in the details as below:
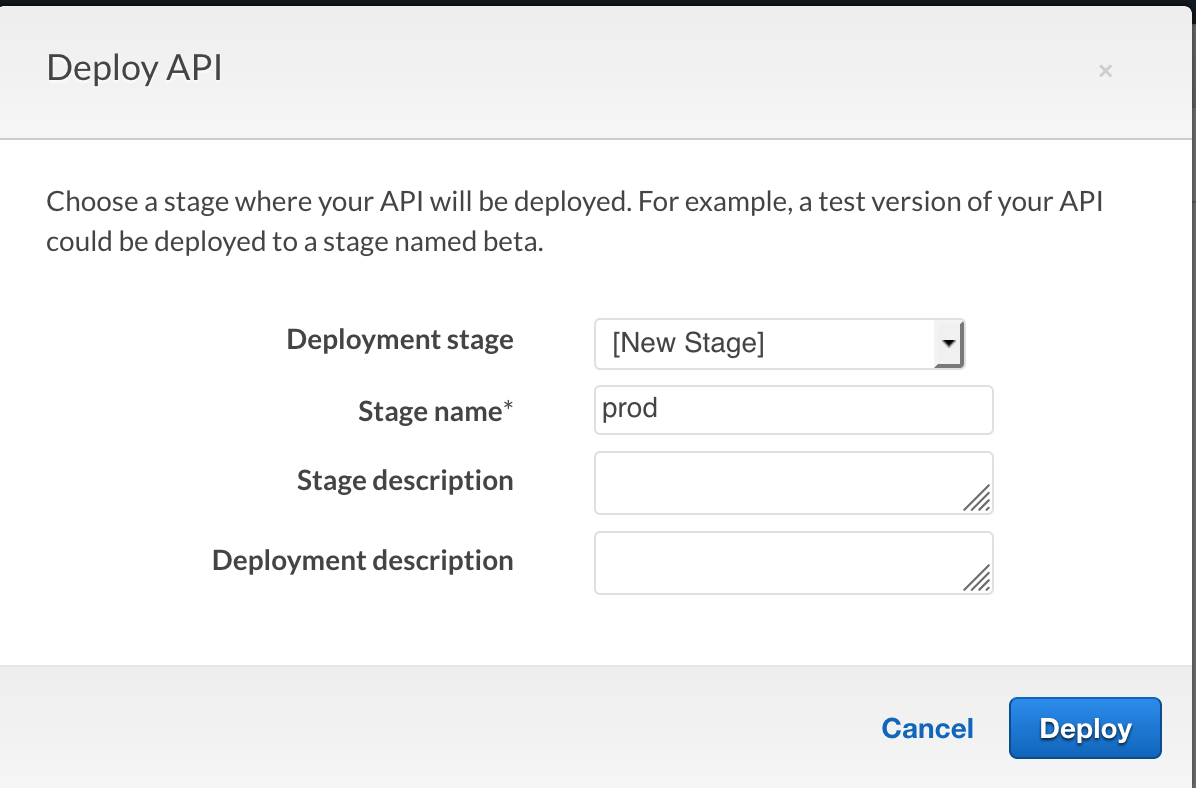
Click Deploy once you’re done. You can now change global settings and limits for your new Stage so that any API deployed to it will inherit these settings. We won’t need to for this deployment.
Click Stages on the left hand side and you’ll see the new Stage that was created. Expand the stage to see the root level and the method immediately below it:

If you select the stage or the method you’ll be shown the URL that you can POST against. This is the URL we’ll use in GitHub. Copy it to your clipboard or notepad.
Configure the GitHub Webhook
GitHub have a preferred alternative to their Services Integration mechanism which is to use GitHub Webhooks. This allows us to make a HTTP POST to any web service whenever a GitHub action occurs. As you can imagine this is way more flexible than the GitHub Services feature. We can integrate with any web service, not just what GitHub supports.
Login to your GitHub account and open up your repo that contains your Hugo website source. Go to the Settings tab (along the top) and select Webhooks on the left hand side. Click Add Webhook and enter the URL of your new API and set the content type to application/json. Here’s how I’ve configured mine:
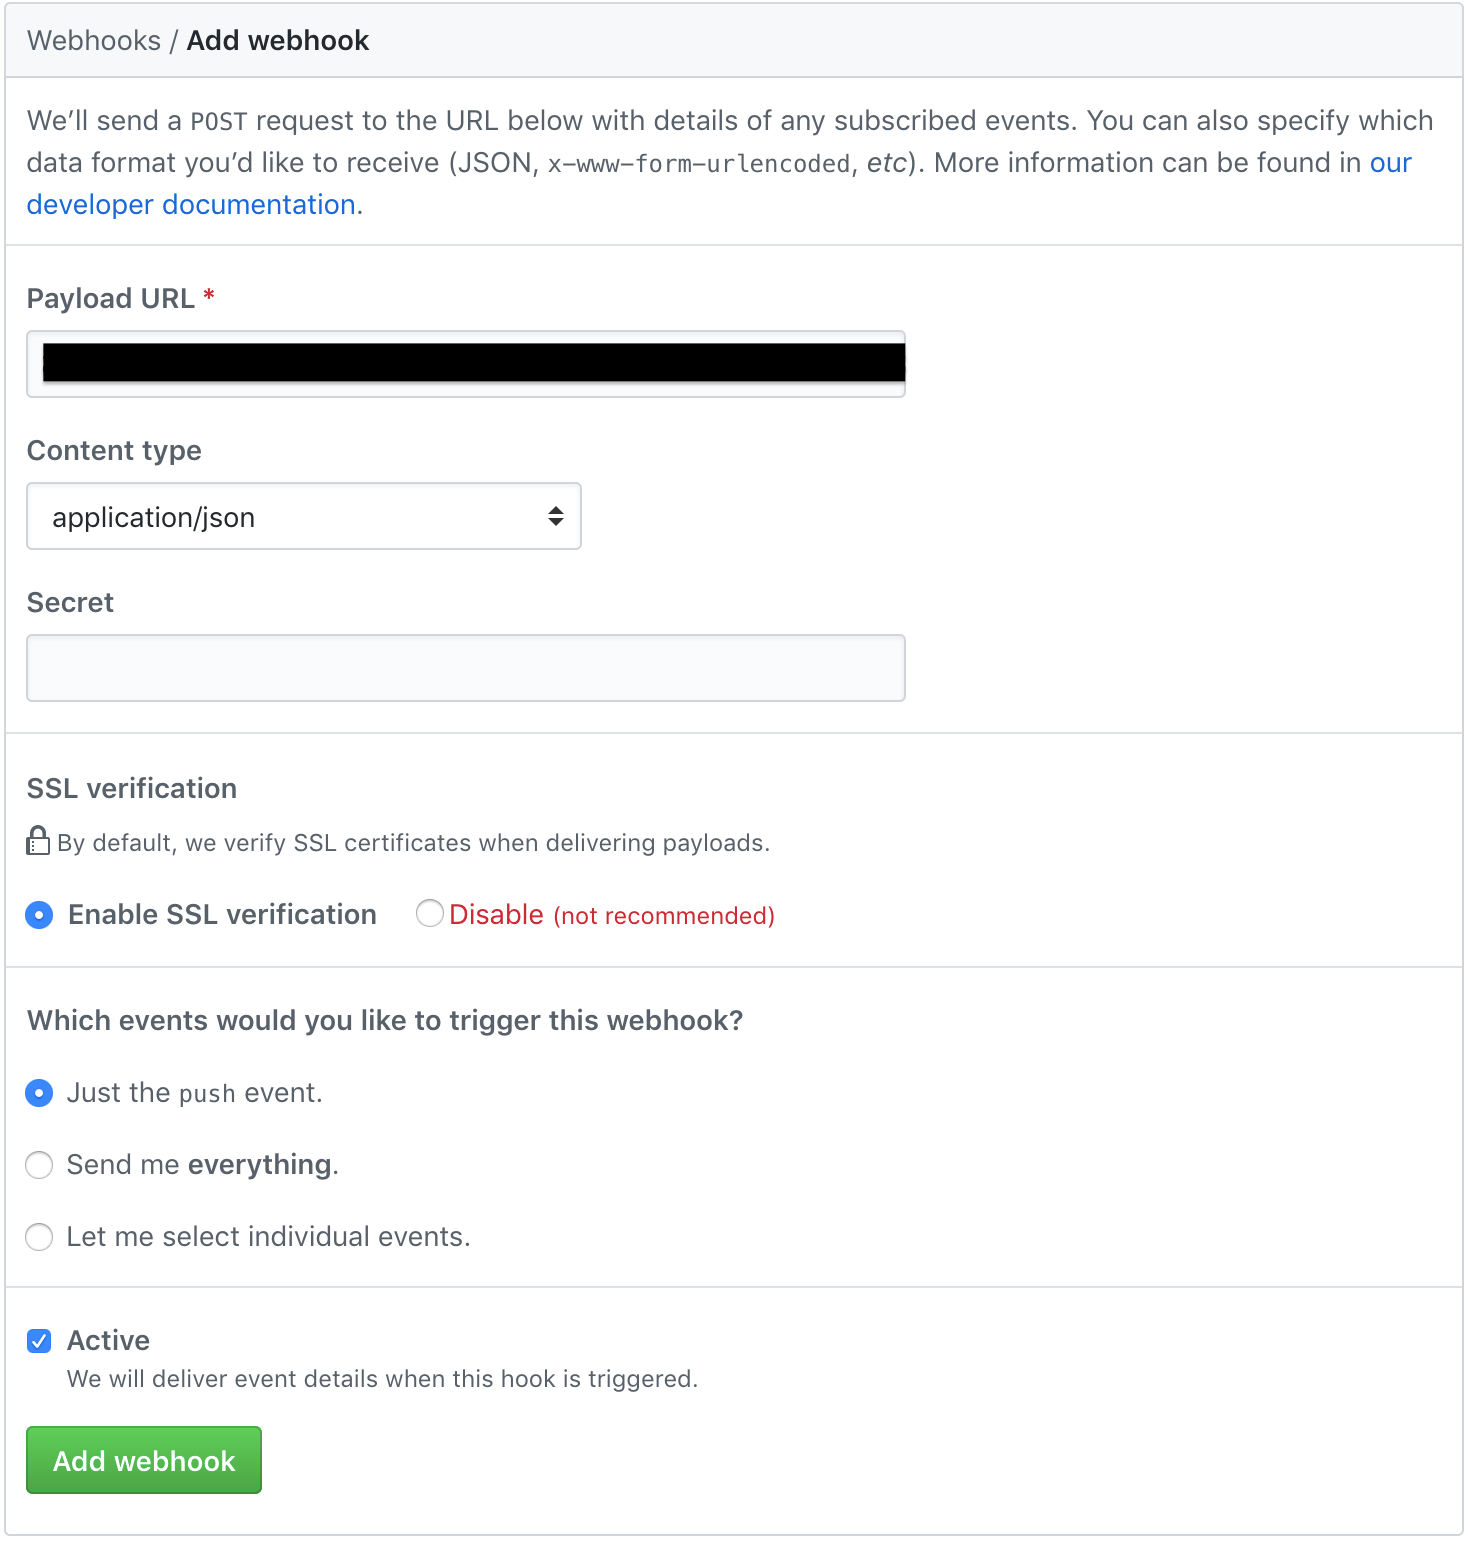
Click Add Webhook.
Refresh the Webhooks page and you should see a green tick next to your webhook:

tldr - The code
Deployer Script
Behold:
 1import logging
 2import os
 3from zipfile import ZipFile
 4import urllib
 5from botocore.vendored import requests
 6import json
 7import tarfile
 8import re
 9import boto3
10
11logger = logging.getLogger()
12logger.setLevel(logging.INFO)
13
14def downloadSite(account, repo):
15    logger.info("Downloading master zip of " + repo + " from GitHub")
16    zip = urllib.urlretrieve('https://github.com/' + account + '/' + repo + '/archive/master.zip', '/tmp/master.zip')
17    siteZip = "/tmp/master.zip"
18
19    with ZipFile(siteZip, 'r') as zip:
20        logger.info("Extracting site files now")
21        zip.extractall("/tmp")
22        logger.info("Extraction complete!")
23
24def downloadHugo(repo):
25    logger.info("Downloading latest Hugo")
26    pattern = re.compile("hugo\\_\\d.+\\_Linux-64bit.tar.gz")
27    response = requests.get("https://api.github.com/repos/gohugoio/hugo/releases/latest")
28    release = response.json()
29    assets = release["assets"]
30    for asset in assets:
31        if pattern.match(asset["name"]):
32            downloadUrl = asset["browser_download_url"]
33            logger.info("Value of downloadUrl: " + downloadUrl)
34    urllib.urlretrieve(downloadUrl, '/tmp/hugo.tar.gz')
35    logger.info("Hugo download complete")
36    logger.info("Extracting Hugo")
37    tar = tarfile.open("/tmp/hugo.tar.gz")
38    tar.extractall("/tmp/" + repo + "-master")
39    tar.close()
40
41def buildSite(repo):
42    logger.info("Building site")
43    os.chdir("/tmp/" + repo + "-master")
44    os.system('./hugo')
45    logger.info("Site built with Hugo")
46    buildDir = os.getcwd() + "/public"
47    return buildDir
48
49def syncS3(path, s3Bucket):
50    logger.info("Copying to S3")
51    session = boto3.Session()
52    s3 = session.resource('s3')
53    bucket = s3.Bucket(s3Bucket)
54    logger.info("Emptying bucket first")
55    bucket.objects.all().delete()
56    for subdir, dirs, files in os.walk(path):
57        for file in files:
58            full_path = os.path.join(subdir, file)
59            with open(full_path, 'rb') as data:
60                bucket.put_object(Key=full_path[len(path)+1:], Body=data, ContentType='text/html')
61    logger.info("Generated site uploaded to S3 successfully.")
62
63def lambda_handler(event, context):
64    sourceRepo = os.environ['GITHUB_REPO']
65    gitAccount = os.environ['GITHUB_ACCOUNT']
66    targetBucket = os.environ['TARGET_BUCKET']
67
68    downloadSite(gitAccount, sourceRepo)
69    downloadHugo(sourceRepo)
70    buildDir = buildSite(sourceRepo)
71    syncS3(buildDir, targetBucket)
72
73    response = {
74        'statusCode': 200,
75        'body': "Site deployed successfully"
76    }
77
78    return response
I’ve got my deploying Lambda execution Memory configuration set to 320MB. This gives me a total execution time of around 20 seconds. If I increase this to the maximum, I can get it down to 15 seconds. For my use case this duration isn’t a problem as most of the time is spent downloading Hugo and the repo master ZIP file. What I’m most focused on is the time between emptying the bucket and syncing all new data, I don’t want visitors to hit a page not found error on my site’s landing page.
My function’s timeout is at 30 seconds because I know that this site build shouldn’t take that long. If my site blows up in size then I may revisit this timeout if the deployment is genuinely taking longer.
Executor Lambda
Not as impressive, but does the job:
 1import boto3
 2import os
 3
 4def lambda_handler(event, context):
 5
 6    client = boto3.client('lambda')
 7    response = client.invoke(
 8        FunctionName=os.environ['LAMBDA_NAME'],
 9        InvocationType='Event'
10    )
11
12    return {
13        "statusCode": 200,
14        "body": 'Hugo Site Builder Executed'
15    }
I’ve taken my Hugo site deploying function from 8.6MB compressed written in Node and with plenty of dependencies, to a couple of lightweight Python functions that don’t even make 2.0KB. I realise this solution does not address adding an API key and authorising requests to the service but I’m hoping to figure that out and do another post. Still, this isn’t bad considering this post was deployed with the new solution ;)
If you have any questions or suggestions I’d love to hear them.